We all are familiar with the concept of Recycle Bin. When you delete something on Windows, first it is moved to the Recycle Bin folder from where you can restore it back to its original location, if required. This feature comes to rescue you when you accidentally delete some important files in your computer.

When we talk about Android, there is no such thing like Recycle Bin in its dictionary. Everything you delete is removed permanently from your phone and there is no way to recovery it. I guess, Android doesn't provide this Recycle Bin feature because of less memory space.
Luckily, there is an app available on Google Play Store named Dumpster that can help you to add a Recycle Bin like feature in your Android phone. So now you would have more freedom to make mistakes as you can easily restore deleted files with this app.
Dumpster is the only app of its kind which brings Windows-like experience to Android by adding Recycle Bin feature in your phone. You can install this app from Google Play Store for free. Once after that, follow this step-by-step guide -
If Dumpster app is not the one you like (for some reasons), you can use its alternative ES File Explorer, which is a popular file manager app for Android. ES File Explorer is loaded with so many features and one of them is Recycle Bin.
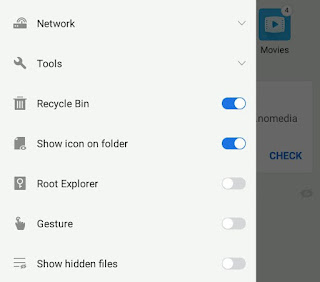
To enable it, first go to Menu (click three vertical lines at the top-left corner) and switch on the button next to the Recycle Bin option. To see all your deleted files, just tap the Recycle Bin button on the app home screen.

Note that, this feature is limited to ES File Explorer app only means if you will delete anything outside this app, it will be deleted permanently, as usual. This is the main drawback of ES File Explorer app. Dumpster however can catch deleted files from anywhere.
So this is how you can add Windows-like Recycle Bin feature in your Android phone and restore accidentally deleted files easily. If you want to ask something, fell free to share it in the comments below.

When we talk about Android, there is no such thing like Recycle Bin in its dictionary. Everything you delete is removed permanently from your phone and there is no way to recovery it. I guess, Android doesn't provide this Recycle Bin feature because of less memory space.
Luckily, there is an app available on Google Play Store named Dumpster that can help you to add a Recycle Bin like feature in your Android phone. So now you would have more freedom to make mistakes as you can easily restore deleted files with this app.
How to add recycle bin on Android with Dumpster
Dumpster is the only app of its kind which brings Windows-like experience to Android by adding Recycle Bin feature in your phone. You can install this app from Google Play Store for free. Once after that, follow this step-by-step guide -
- Open Dumpster and see intro pages to know more about the features of this app. Click the forward arrow icon to move to the next page. You can also skip this intro section.
- Now whenever you will delete anything, it will move to the Recycle Bin folder and you will see them in the home screen of this app (as shown in the below picture). You can sort deleted files on the basis of their size, date, type or name.

- If you want to restore any file, first open it and then "Restore" button from the bottom menu. File will be moved back to its original location.

- To delete all items from Recycle Bin at once, tap the menu button (three vertical lines at the top-left corner) and click "Empty Dumpster" option. Note: you should clear Recycle Bin regularly to free up some space in your phone.

- You can also enable Auto Clean option to automatically delete files after certain time period. To enable this feature, again tap the menu button, click Settings → Auto Clean option and select the time period.

- From the same Settings page, you can also select the files you want Dumpster to save in the Recycle Bin folder.

Alternative method: Use ES File Explorer
If Dumpster app is not the one you like (for some reasons), you can use its alternative ES File Explorer, which is a popular file manager app for Android. ES File Explorer is loaded with so many features and one of them is Recycle Bin.
To enable it, first go to Menu (click three vertical lines at the top-left corner) and switch on the button next to the Recycle Bin option. To see all your deleted files, just tap the Recycle Bin button on the app home screen.

Note that, this feature is limited to ES File Explorer app only means if you will delete anything outside this app, it will be deleted permanently, as usual. This is the main drawback of ES File Explorer app. Dumpster however can catch deleted files from anywhere.
So this is how you can add Windows-like Recycle Bin feature in your Android phone and restore accidentally deleted files easily. If you want to ask something, fell free to share it in the comments below.

Leave A Comment