Xperia is one of the best and even most selling smartphone series by Sony. There are a number of features available which makes it unique and different from other manufacturers. Most of the Sony Xperia phones above 20k range are waterproof and they are very good in performance. When we talk about camera quality, Sony is among the top most brands which comes in our mind. I am using Xperia C3 Dual and it has 8 MP rear and 5 MP front camera with flash both the sides.

Although the picture quality and resolutions are very good but there is a problem in Sony's camera. You might have noticed that as you will zoom in the picture, its pixels will break or we can say that it is little blur and looks like a hand-made painting. There is a quick fix to this problem and that's what we are going to discuss here.
By default, your camera will capture a full resolution picture of 16:9 ratio. However, it was found that this much high-resolution will make your photo blur. Changing the photo resolution can help you to fix this issue. Here's a step-by-step guide -
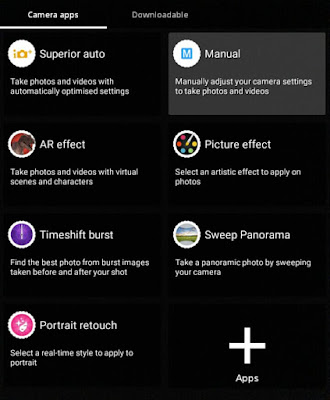
For superior auto mode, your phone will automatically optimize the camera settings for best results. However, if you prefer manual mode, you can customize a number of things like brightness, flash, screen selection and other camera settings such as HDR, smile shutter, ISO and many more. Here's everything you need to do for best possible photo -

You can also download third-party camera applications from Google Play Store. So this is how you can customize camera settings in your Sony Xperia phone. If you would like to add something in this tutorial, please do share it in the comments below.

Although the picture quality and resolutions are very good but there is a problem in Sony's camera. You might have noticed that as you will zoom in the picture, its pixels will break or we can say that it is little blur and looks like a hand-made painting. There is a quick fix to this problem and that's what we are going to discuss here.
Change photo resolutions
By default, your camera will capture a full resolution picture of 16:9 ratio. However, it was found that this much high-resolution will make your photo blur. Changing the photo resolution can help you to fix this issue. Here's a step-by-step guide -
- First launch the Camera app in your Sony Xperia phone.
- Now tap the menu button (three dots at the top-right corner of the screen).
- If you are using superior auto mode, click "Aspect ratio" option, otherwise click the "Resolution" option for manual mode.

- Your current aspect ratio would be 16:9 by default. Just change it to 4:3 (8MP) or any other ratio, whichever you find better.

Customize other camera settings
For superior auto mode, your phone will automatically optimize the camera settings for best results. However, if you prefer manual mode, you can customize a number of things like brightness, flash, screen selection and other camera settings such as HDR, smile shutter, ISO and many more. Here's everything you need to do for best possible photo -
- Screen selection - Use this feature to select the scenes like landscape, document, night, party, beach, sport etc,. Camera will automatically adjust the setting according to the scene you will pick.
- White balance - This setting is to adjust the color and brightness balance according to the lightning conditions. For example, if you are in dark room, you can increase the brightness by changing exposure value (EV).
- Flash - You can manually change the flash mode to fill the photo with light when brightness is low. Set this option to auto mode and it will automatically determine whether the photo needs flash or not.
- Focus mode - You can manually use focus modes such as face detection, touch focus and object tracking.
- HDR - HDR stands for High Dynamic Range. Instead of taking single photo, HDR takes 3 photos at different exposure and then combine them to get more better results.
- ISO - Lower ISO is less sensitive to light. While on the other hand, higher ISO number increases the sensitivity of your camera.
- Image Stabiliser - This setting helps you to stabilize the photo when you have shaking hand.

You can also download third-party camera applications from Google Play Store. So this is how you can customize camera settings in your Sony Xperia phone. If you would like to add something in this tutorial, please do share it in the comments below.

Leave A Comment