Although Android phones have good Internal memory but due to system files and other third-party apps, it's always on the verge of low space. Android's System alone takes up to 4GB of space. Moreover, the apps you'll install will directly go into your phone's Internal memory.
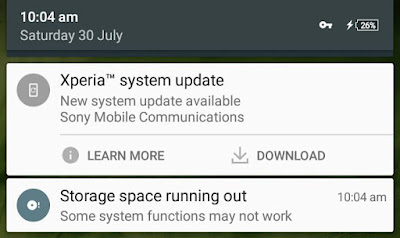
When your phone memory is below threshold limit (say less than 200MB), you'll get a new notification from Android side, alerting you for the storage running out of low space issue. (See preview in the below screenshot)
Low memory space isn't good for your Android system health. It can badly affect your device's performance. Due to which, some system functions may stop working, apps and widgets will crash automatically and it will slow down the speed as well.
It's really annoying when someone sends you the new movie or game but there is no sufficient space in your phone memory to receive the incoming file. You might have faced this problem many times. Right? Well you're not the only one.
To be on the safe side, it's very important to monitor and manage the free space in your Android phone's Internal memory. If your storage is also running out of low space, read on to find out how you can free up to 1GB of space in your Android phone instantly.
Android phones also have their separate and reserved RAM memory which is used by system and other third-party apps to save their cached data. In fact, this is the place where they work and do what they were made to do. Each app needs its own room to operate.
For example, if you'll use an app (say Gallery or photo editor), it will save the temporary files (such as images, text or thumbnails) in RAM memory. Note that, cached data makes it easier to retrieve same files again quite faster, which in turns boost up the speed and improve user experience, of course.
As soon as the operation is completed, apps automatically leave the RAM memory and delete all their cached data. While some other apps don't do so. Due to this reason, a lot of cached data is saved in phone's Internal memory after a long use and it can be in hundreds of MBs.
As this cached data is of no use, so it's better to clear it ASAP and free up some space. Here's a step-by-step guide to delete all apps cached data manually -
First of all, go to "Settings" and then click "Storage" option from the menu list. Now scroll down and tap "Cached data" option.
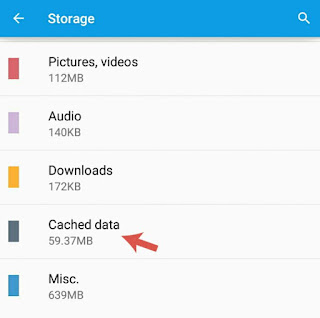
After this, a pop up box will appear. Simply click OK to allow permission and that's it. If you're lucky, deleting this cached data can alone free up to 500MB (or more) of space in your phone's Internal memory.
Note that, some Android versions don't have this option to delete all apps cached data simultaneously. This may not work if you've an older version of Android running in your phone. In that case, either update the software or you can manually clear each app cached data one by one.
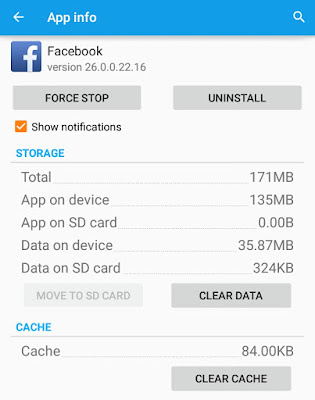
To do this, first go to "Settings > Apps (or Applications)" and then scroll left to "All" tab. Here find the app whose cached data you want to delete and open it. In the following window, tap "Clear cache" button. You can clear app data as well but that will delete your media files also. To know more about this topic, read how to delete particular app cache and app data in Android.
Apart from this, there are a couple of third-party apps available on Google Play Store for free which claim to delete all system junk files and cached data automatically. Clean Master and CCleaner are good examples which comes under the task killer apps category. In my previous article, I had already discussed whether the apps like Clean Master are really useful or not, which is worth reading.
If you'll look at the storage report of your Android phone, you'll find that apps and system are using the maximum space. As we can't delete system built-in files, so you've to focus mainly on third-party apps only which you've installed manually.
You might have hundreds of apps installed in your phone. But there are hardly a two or four apps that you use daily. Imagine how it would to uninstall all useless applications? You can easily save up to 400+MB of space doing this. Simply follow these steps -
Again go back to the "Settings" menu and click "Apps" option. Now move to the "All" tab and find the app you want to uninstall. In the app info window, tap the "Uninstall" button and that's it.
Note that, there is no need to uninstall all applications, of course not. As of a general rule, select all those apps which are very big in size (generally more than 100MB) and not in use any more. But make sure to exclude all system pre-installed and in-built apps (such as Android System, System UI, Google Search, Google Play services, Google Keyboard etc.,).
News and game apps are the main culprit. They eat unnecessary space in phone memory. You can also delete Facebook, Twitter, Snapchat and other social media apps as you can directly access their website from browsers (such as Chrome or UC Browser). This way, you can save many MBs of space.
Another way to free up the space in your Android phone is by moving all media files from the Internal memory to the SD card. Unlike pen drives, SD cards are very small in size physically and can save GBs of data. Moreover, they are very cheap (costs few dollars only) and you can easily buy them with your monthly pocket money.
I recommend you to buy at least 8GB of SD card. Currently I am using 16GB micro SD card and it's enough to store all my media files. Before buying it, first check the expandable memory size of your Android phone. When you're ready, use any of these methods to move all the media files in it.
As already mentioned, all apps you will install will directly go into your phone's Internal memory. There is no way to choose the custom storage path at the time of installing the app. If you don't want to uninstall an app, another way to free up some space is by moving it to the SD card.
Good thing is that, you don't need to use any third-party tool as Android has an in-built option to move installed apps to the SD card. Please note that, not all applications can be moved this way for some reasons. Facebook and WhatsApp are one of them.
Although you can force move them with root access but that is beyond the scope of this tutorial. Also, our main aim is just to free up some space and that can be done easily without moving such apps.
Before starting, first you've to short-list all the applications that you want to move. Again use the same general rule as it is in case of uninstalling. After selecting few apps, follow these steps to move them -
First of all, go to "Settings > Apps > All tab". Now find and click the app name. After this, tap the "Move to SD Card" button and that's it.
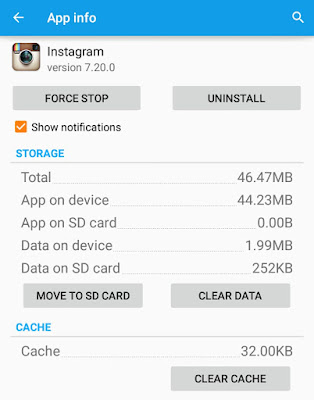
It will take few seconds or a minute to move all the app data. Another important thing is that, if you'll unplug or unmount the SD card, app will stop working and it will unavailable until you plug-in or mount the SD card again. However, there is no loss of data at all and it's completely safe. This way, you can free up few more hundred MBs of space in your Android phone
Last but not least, you can also create a backup of your important files on cloud storage. One of best way is it to upload them on your Google Drive or Dropbox account. I personally find this method pointless here as we have other better options to safely back up the files, such as moving them to the SD Card or Pen Drive, which I have already explained above.
So this is how you can free up to 1GB (or I must say, more than 1GB) of space in your Android phone. If you've some burning questions in your mind, feel free to drop them in the below comments. Stay tuned for more interesting tutorials. Did I had missed something?

When your phone memory is below threshold limit (say less than 200MB), you'll get a new notification from Android side, alerting you for the storage running out of low space issue. (See preview in the below screenshot)

Low memory space isn't good for your Android system health. It can badly affect your device's performance. Due to which, some system functions may stop working, apps and widgets will crash automatically and it will slow down the speed as well.
It's really annoying when someone sends you the new movie or game but there is no sufficient space in your phone memory to receive the incoming file. You might have faced this problem many times. Right? Well you're not the only one.
To be on the safe side, it's very important to monitor and manage the free space in your Android phone's Internal memory. If your storage is also running out of low space, read on to find out how you can free up to 1GB of space in your Android phone instantly.
Clear apps cached data
Android phones also have their separate and reserved RAM memory which is used by system and other third-party apps to save their cached data. In fact, this is the place where they work and do what they were made to do. Each app needs its own room to operate.
For example, if you'll use an app (say Gallery or photo editor), it will save the temporary files (such as images, text or thumbnails) in RAM memory. Note that, cached data makes it easier to retrieve same files again quite faster, which in turns boost up the speed and improve user experience, of course.
As soon as the operation is completed, apps automatically leave the RAM memory and delete all their cached data. While some other apps don't do so. Due to this reason, a lot of cached data is saved in phone's Internal memory after a long use and it can be in hundreds of MBs.
As this cached data is of no use, so it's better to clear it ASAP and free up some space. Here's a step-by-step guide to delete all apps cached data manually -
First of all, go to "Settings" and then click "Storage" option from the menu list. Now scroll down and tap "Cached data" option.

After this, a pop up box will appear. Simply click OK to allow permission and that's it. If you're lucky, deleting this cached data can alone free up to 500MB (or more) of space in your phone's Internal memory.
Note that, some Android versions don't have this option to delete all apps cached data simultaneously. This may not work if you've an older version of Android running in your phone. In that case, either update the software or you can manually clear each app cached data one by one.
To do this, first go to "Settings > Apps (or Applications)" and then scroll left to "All" tab. Here find the app whose cached data you want to delete and open it. In the following window, tap "Clear cache" button. You can clear app data as well but that will delete your media files also. To know more about this topic, read how to delete particular app cache and app data in Android.

Apart from this, there are a couple of third-party apps available on Google Play Store for free which claim to delete all system junk files and cached data automatically. Clean Master and CCleaner are good examples which comes under the task killer apps category. In my previous article, I had already discussed whether the apps like Clean Master are really useful or not, which is worth reading.
Uninstall unused apps
If you'll look at the storage report of your Android phone, you'll find that apps and system are using the maximum space. As we can't delete system built-in files, so you've to focus mainly on third-party apps only which you've installed manually.
You might have hundreds of apps installed in your phone. But there are hardly a two or four apps that you use daily. Imagine how it would to uninstall all useless applications? You can easily save up to 400+MB of space doing this. Simply follow these steps -
Again go back to the "Settings" menu and click "Apps" option. Now move to the "All" tab and find the app you want to uninstall. In the app info window, tap the "Uninstall" button and that's it.
Note that, there is no need to uninstall all applications, of course not. As of a general rule, select all those apps which are very big in size (generally more than 100MB) and not in use any more. But make sure to exclude all system pre-installed and in-built apps (such as Android System, System UI, Google Search, Google Play services, Google Keyboard etc.,).
News and game apps are the main culprit. They eat unnecessary space in phone memory. You can also delete Facebook, Twitter, Snapchat and other social media apps as you can directly access their website from browsers (such as Chrome or UC Browser). This way, you can save many MBs of space.
Move media files to the SD card
Another way to free up the space in your Android phone is by moving all media files from the Internal memory to the SD card. Unlike pen drives, SD cards are very small in size physically and can save GBs of data. Moreover, they are very cheap (costs few dollars only) and you can easily buy them with your monthly pocket money.
I recommend you to buy at least 8GB of SD card. Currently I am using 16GB micro SD card and it's enough to store all my media files. Before buying it, first check the expandable memory size of your Android phone. When you're ready, use any of these methods to move all the media files in it.
- Use Android transfer option: In latest version (5.0 or later), Android has added a new option which let you transfer all media files to the SD card in just a single tap. To use it, go to "Settings > Storage". Now click "Transfer data to SD card" option under Miscellaneous section. Now tick mark the files you want to move and finally tap the "Transfer" button. That's it.
- Use computer or laptop: It's pretty much easy to transfer or move files to the SD card using computer. Just plug-in the data cable in USB port and pair them. Now open the phone disk and here you'll find two separate storage path as Internal memory and SD card. Select the files or folders you wish to move and paste them in SD card.
- Use Android File Manager: You can also use Android File Manager app to transfer the media files. Some manufacturers provide their own file manager or you can install number of third-party file manager apps from Google Play Store. Good examples are ES Explorer and File Commander. Transferring files to the SD card is very easy with these file manager apps.
Move installed apps to the SD card
As already mentioned, all apps you will install will directly go into your phone's Internal memory. There is no way to choose the custom storage path at the time of installing the app. If you don't want to uninstall an app, another way to free up some space is by moving it to the SD card.
Good thing is that, you don't need to use any third-party tool as Android has an in-built option to move installed apps to the SD card. Please note that, not all applications can be moved this way for some reasons. Facebook and WhatsApp are one of them.
Although you can force move them with root access but that is beyond the scope of this tutorial. Also, our main aim is just to free up some space and that can be done easily without moving such apps.
Before starting, first you've to short-list all the applications that you want to move. Again use the same general rule as it is in case of uninstalling. After selecting few apps, follow these steps to move them -
First of all, go to "Settings > Apps > All tab". Now find and click the app name. After this, tap the "Move to SD Card" button and that's it.

It will take few seconds or a minute to move all the app data. Another important thing is that, if you'll unplug or unmount the SD card, app will stop working and it will unavailable until you plug-in or mount the SD card again. However, there is no loss of data at all and it's completely safe. This way, you can free up few more hundred MBs of space in your Android phone
Back up files on cloud storage
Last but not least, you can also create a backup of your important files on cloud storage. One of best way is it to upload them on your Google Drive or Dropbox account. I personally find this method pointless here as we have other better options to safely back up the files, such as moving them to the SD Card or Pen Drive, which I have already explained above.
So this is how you can free up to 1GB (or I must say, more than 1GB) of space in your Android phone. If you've some burning questions in your mind, feel free to drop them in the below comments. Stay tuned for more interesting tutorials. Did I had missed something?

Leave A Comment