Are you bored of using those basis themes of Windows 7? If yes then you might be thinking that how to change it? Fortunately, Windows allow us to apply custom themes. You can download tons of theme packs from the Internet but sometimes, we want to create a new theme with our own photos collection. In this tutorial, I will guide you how to create a brand new theme for Windows 7.
Before moving to the steps, first tell me what do you think about themes? Most of the people say that they changes the desktop background with new slide show images. Apart from this, Windows themes can also customize the window color, sound effects, mouse pointers, desktop icons and screen saver. While creating a new theme, we have to add all these things. Now lets start from basics.
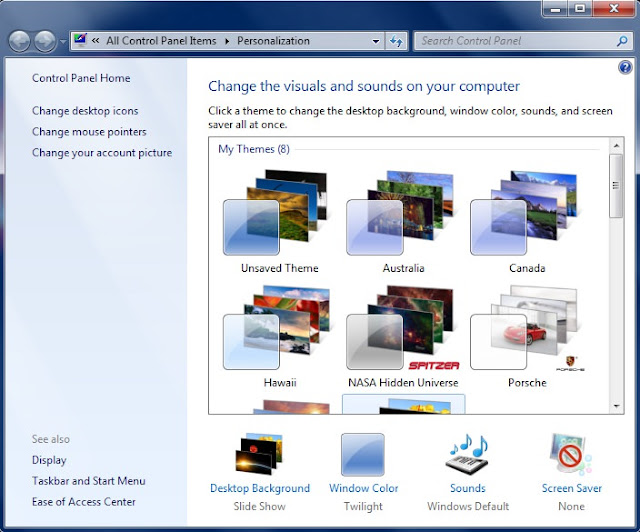
First of all, open personalization section. To open it, right-click on desktop and click "Personalize". After this, a new window will open where you'll find all pre-installed themes. You can apply any of them. At the bottom section, you'll find 4 options as Desktop Background, Window Color, Sound and Screen Saver. These options are building blocks of Windows theme. Here is a complete explanation all these things -
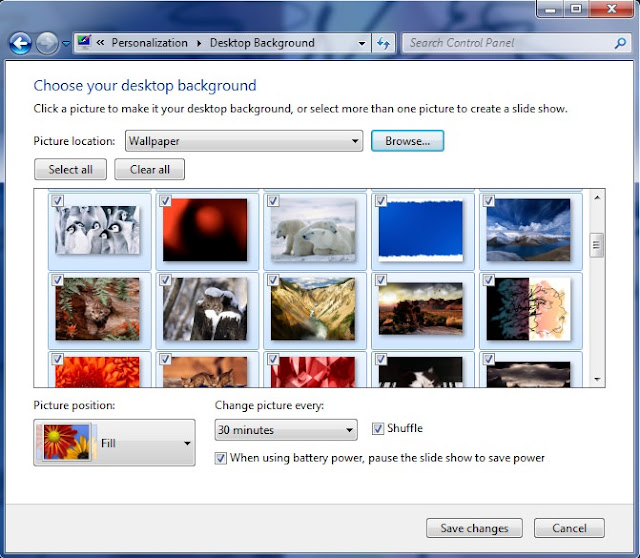
This option let you choose image(s) for your theme pack. Those photos will appear as a slide show in desktop background. To add them, simply click this option and a new window will open. After this, click on "Browse" button and select the location where all images are saved.
Note: Before this, you can move all images in new folder so as to select them from same location.
After selecting the folder, all images inside it will be selected automatically. You can also remove any unwanted photo manually by un-tick button.
Now its time to set picture position. As name itself speaks, this option let you choose the position of picture on desktop background. By default, it will be "Fill". However, you can change it to any other position as per your own choice. You can also preview the output side by side.
Now you've to set the time period after which you want to change the background image. Simply click "Change Picture Every" option and select any time period. Another option is "Shuffle". If this was enabled, all images will be arranged in random order or they will be displayed randomly.
Also make sure to enable Power Saver option. This will help you to save your laptop battery life by pausing slide show when using battery power. Finally click on "Save changes" button. This will take you to the personalization window where you'll find a new theme added under "My themes" section named as "Unsaved theme". Simply click it to apply. Our next aim is to customize its color, sound, mouse pointers, icons and screen saver effects.

Window color changes the color of window borders, start menu and taskbar. Click this option and select your favorite color. By default, there are 16 colors only. You can also adjust the intensity of color and enable transparency.
If your favorite color is not in 16 default colors, you can use a color mixer to create it. Click the drop-down arrow icon to show color mixer. Now adjust the hue, saturation and brightness value. Again you can preview the output side by side.
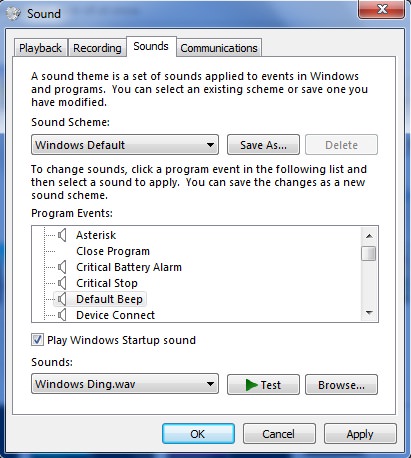
Next comes sounds option. A sound theme is a set of sound applied to the events in Windows and programs. For example, a sound whenever an error message appears. You can select an existing scheme or save one you've modified. To create a new scheme, select any program event and choose sound for it. You can also test it live. Moreover, if you to add your own sound then, click "Browse" button and add it.
After settings all program events, click on "OK" button to save your modified scheme. A pop up box will ask you to add scheme name. Type anything you want and save it.
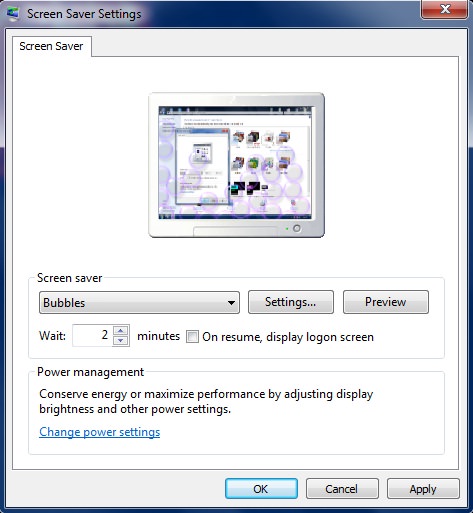
Last but not least, you can set the screen saver for your custom theme pack. To do this, open screen saver option and select any effect. One of my favorite screen saver is Bubbles. Another amazing effect is Google Photos slide show. This will display a photo slide show as a screen saver. You can also check the live preview of screen saver by clicking "Preview" button. Moreover, you can customize the settings for some effects.
Now set the time period after which you want to start this screen saver. Simply type the number of minutes in wait tab. If you want to display a logon screen after resume than, tick mark the button next to it. This will help you to protect your data when you're away from your computer. If you've a password protection then user need to type it so as to access your system data. You can also change the power settings to reduce brightness level. When everything is done, hit OK button to save all these changes.
You can only change icons for my computer, administrator folder, network and recycle bin. To change them, go back to personalization window and click "Change desktop icons" option from left sidebar menu. This will open a new window where you'll find 5 default icons.
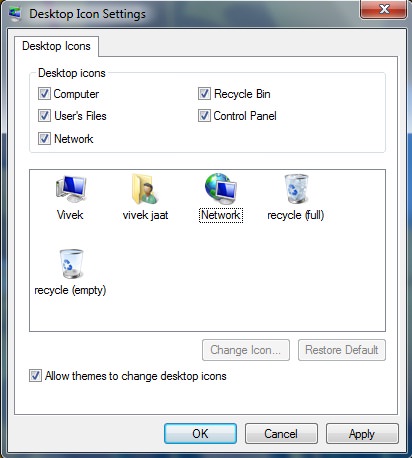
Now choose the item whose icon you wish to change and click "Change Icon" button. After this, select an icon from the list or add it by browse button. To save changes, hit Apply button followed by OK.
In the same way, click "Change mouse pointers" option. Select any scheme or modify them. You can also use default pointers or add your own by clicking browse button.
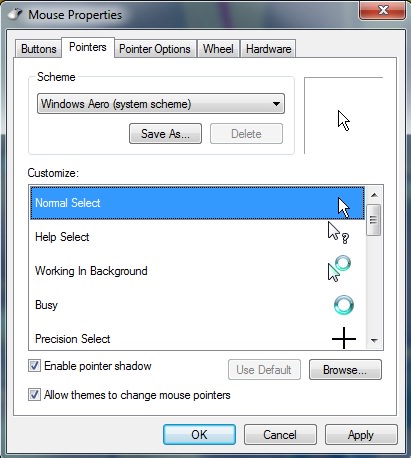
Note: Make sure to tick mark "Allow themes to change desktop icons or mouse pointers" buttons on both cases.
Also Read: Boost Windows 7 speed by turning off visual effects
Now you've almost done. The only thing you need to do is to save your newly created theme. To do this, go back to personalization window and right-click on "Unsaved theme".
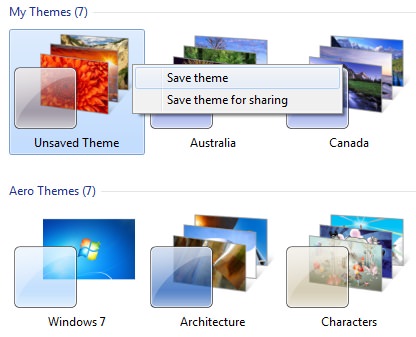
A new menu will open. From here click on "Save theme" option and type any name. Finally hit "Save" button and that's it. Apart from this, you can also save your theme as a file. The file type extension for Windows themes is ".themepack". As a file, you can share your theme with your friends or send it online. To create a theme pack file, again right-click and this time, select "Save theme for sharing" option. Now choose the location, type file name and click "Save" button.
In this way, you can easily create your own custom theme. This tutorial was for Windows 7 users only. However it can be applied on other version also with same approach. If you're facing any problem, fell to ask me in comment box.

Before moving to the steps, first tell me what do you think about themes? Most of the people say that they changes the desktop background with new slide show images. Apart from this, Windows themes can also customize the window color, sound effects, mouse pointers, desktop icons and screen saver. While creating a new theme, we have to add all these things. Now lets start from basics.
Creating a Custom Windows 7 Theme
First of all, open personalization section. To open it, right-click on desktop and click "Personalize". After this, a new window will open where you'll find all pre-installed themes. You can apply any of them. At the bottom section, you'll find 4 options as Desktop Background, Window Color, Sound and Screen Saver. These options are building blocks of Windows theme. Here is a complete explanation all these things -

1. Add Desktop Background

This option let you choose image(s) for your theme pack. Those photos will appear as a slide show in desktop background. To add them, simply click this option and a new window will open. After this, click on "Browse" button and select the location where all images are saved.
Note: Before this, you can move all images in new folder so as to select them from same location.
After selecting the folder, all images inside it will be selected automatically. You can also remove any unwanted photo manually by un-tick button.
Now its time to set picture position. As name itself speaks, this option let you choose the position of picture on desktop background. By default, it will be "Fill". However, you can change it to any other position as per your own choice. You can also preview the output side by side.
Now you've to set the time period after which you want to change the background image. Simply click "Change Picture Every" option and select any time period. Another option is "Shuffle". If this was enabled, all images will be arranged in random order or they will be displayed randomly.
Also make sure to enable Power Saver option. This will help you to save your laptop battery life by pausing slide show when using battery power. Finally click on "Save changes" button. This will take you to the personalization window where you'll find a new theme added under "My themes" section named as "Unsaved theme". Simply click it to apply. Our next aim is to customize its color, sound, mouse pointers, icons and screen saver effects.
2. Change Window Color

Window color changes the color of window borders, start menu and taskbar. Click this option and select your favorite color. By default, there are 16 colors only. You can also adjust the intensity of color and enable transparency.
If your favorite color is not in 16 default colors, you can use a color mixer to create it. Click the drop-down arrow icon to show color mixer. Now adjust the hue, saturation and brightness value. Again you can preview the output side by side.
3. Add Sound Scheme

Next comes sounds option. A sound theme is a set of sound applied to the events in Windows and programs. For example, a sound whenever an error message appears. You can select an existing scheme or save one you've modified. To create a new scheme, select any program event and choose sound for it. You can also test it live. Moreover, if you to add your own sound then, click "Browse" button and add it.
After settings all program events, click on "OK" button to save your modified scheme. A pop up box will ask you to add scheme name. Type anything you want and save it.
4. Choose Screen Saver

Last but not least, you can set the screen saver for your custom theme pack. To do this, open screen saver option and select any effect. One of my favorite screen saver is Bubbles. Another amazing effect is Google Photos slide show. This will display a photo slide show as a screen saver. You can also check the live preview of screen saver by clicking "Preview" button. Moreover, you can customize the settings for some effects.
Now set the time period after which you want to start this screen saver. Simply type the number of minutes in wait tab. If you want to display a logon screen after resume than, tick mark the button next to it. This will help you to protect your data when you're away from your computer. If you've a password protection then user need to type it so as to access your system data. You can also change the power settings to reduce brightness level. When everything is done, hit OK button to save all these changes.
5. Change Desktop Icons & Mouse Pointers
You can only change icons for my computer, administrator folder, network and recycle bin. To change them, go back to personalization window and click "Change desktop icons" option from left sidebar menu. This will open a new window where you'll find 5 default icons.
Now choose the item whose icon you wish to change and click "Change Icon" button. After this, select an icon from the list or add it by browse button. To save changes, hit Apply button followed by OK.
In the same way, click "Change mouse pointers" option. Select any scheme or modify them. You can also use default pointers or add your own by clicking browse button.

Note: Make sure to tick mark "Allow themes to change desktop icons or mouse pointers" buttons on both cases.
Also Read: Boost Windows 7 speed by turning off visual effects
Save Your New Theme Pack
Now you've almost done. The only thing you need to do is to save your newly created theme. To do this, go back to personalization window and right-click on "Unsaved theme".

A new menu will open. From here click on "Save theme" option and type any name. Finally hit "Save" button and that's it. Apart from this, you can also save your theme as a file. The file type extension for Windows themes is ".themepack". As a file, you can share your theme with your friends or send it online. To create a theme pack file, again right-click and this time, select "Save theme for sharing" option. Now choose the location, type file name and click "Save" button.
In this way, you can easily create your own custom theme. This tutorial was for Windows 7 users only. However it can be applied on other version also with same approach. If you're facing any problem, fell to ask me in comment box.

Leave A Comment