It happens many times, you are Google searching your favorite topics and all web pages are opened in GoogleWebLight mode. This happens whenever a slow Internet connection is encountered by Google and after this it automatically transcode (means convert) all web pages into optimized pages to use 80% less data. Of course, this will boost up your surfing speed.
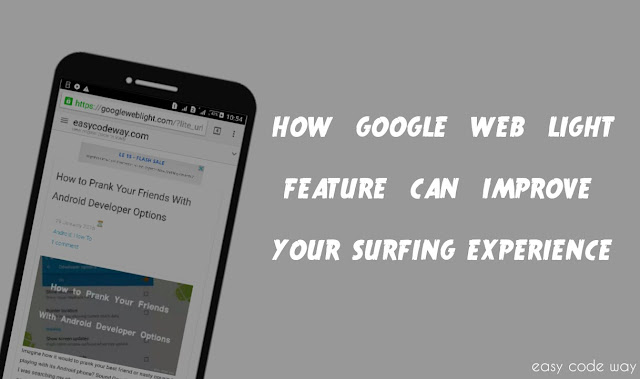
As for now, this feature is limited to mobile phones only. However, you can also use it on your desktop browsers but for that, you've to manually change the web-address of pages you want to load in GoogleWebLight mode. In this tutorial, I will guide you how to do that and after that we will discuss some of its interesting feature. So lets begin now!
Imagine, how it would to save your net data and loading time while reading your favorite blog? Sound Good? Hm. GoogleWebLight feature can help you to do this. Now if you want to use this feature, follow these instructions -
First of all, copy below web-address in URL tab and replace "[your_website_URL]" with the website you want to transcode with GoogleWebLight.
http://googleweblight.com/?lite_url=[your_website_URL]
Make sure that you've typed "https://www." before the domain name. For Example:
http://googleweblight.com/?lite_url=https://www.easycodeway.com
Finally hit enter button and let the magic begin. It will automatically compress the whole web-page and present you with the simplest format. Now if you'll click on any of the internal link then it will be automatically loaded in the same transcoded version. So how was it ? Isn't that cool ?
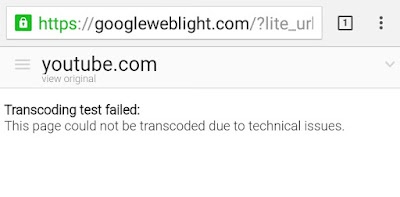
Note: At present, some sites are not transcoded due to technical problems. These include video sites (YouTube is a good example), site that uses lots of cookies (like Facebook) and which are technically hard to transcode.
If you'll load such pages, then it will display an error message as follows -
You know it is very important to keep user experience and performance in balance and undoubtedly, Google understand this very well. They know what users actually want and that's why GoogleWebLight is well optimized for user experience and performance. Now I think you are more curious to know that how this thing works. Here I am presenting a small own case study which can surely help you to give better dive in this topic.
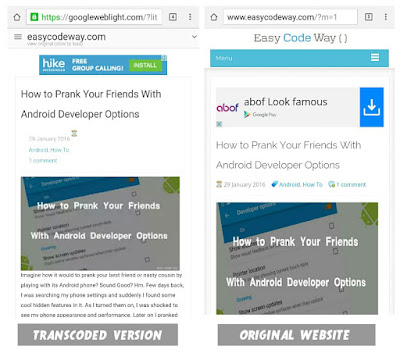
I experimented easy code way domain in GoogleWebLight and then compared the data with original website. Look I found some interesting changes.
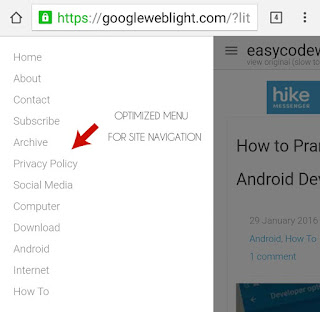
First of all, have a look at the navigation menu. In transcoded version, there is no navigation links while in original website, drop-down menu comes whenever you'll click on "Menu" button. I am using a JavaScript for scroll down feature. After this, I concluded that GoogleWebLight has completed omitted this JavaScript code in transcoded version which itself is a very big achievement to improve the site load time. Its the JavaScript who is the main culprit to reduce web pages load time but I think GoogleWebLight is smart enough to handle it. ;) However if you'll click on those three lines from top-right corner, you'll find that there is another menu for site navigation. This means that, GoogleWebLight has created its own menu which is well optimized and lightweight.
Now have a look at the post images. There is a little change in quality. In some places, even I can't locate the image which was present in original website. So again this is a plus point for GoogleWebLight. It only represents important data and keeps other waste out.
As like JavaScript and Images, transcoded page will also make few changes in CSS programming. I think you don't need any explanation for this. Just look at the picture bro. You can easily find out the change in margin, padding, hover effect, font-size and blaw blaw blaw. Again, one thing to note here is that there is no external font family used in transcoded version while I am using few of the google fonts in easy code way. So this will prevent the browser from loading that font family from external links and thus again reduce the load time and improve more speed.
Last but not least, GoogleWebLight will display only 3 ads units in a single web page and that too at the fixed places. Three? Well don't suppose it to be ad free. Google itself is serving AdSense ads and if their will be 0 ads then many publishers will lose huge money. This again proves that Google is neutral everywhere. Here it keeps balance between users and website ads publishers.
Above is just my own case study. Now if you want to compare the page load time between the transcoded and non-transcoded version than you can use an online tool named as www.webpagetest.org
Actually this tool is a Google product and it can be very helpful in many ways especially if you are a blogger or web-developer. It will provide you complete information about your webpages performance.
To use it, simply open the above website and then write the web-address you want to test. After this, click enter button and leave it for few minutes. It may take up to 10 minutes to scan your webpage. When I tested easy code way in this, it takes 5 minute and after that it display a screen as shown in below picture.
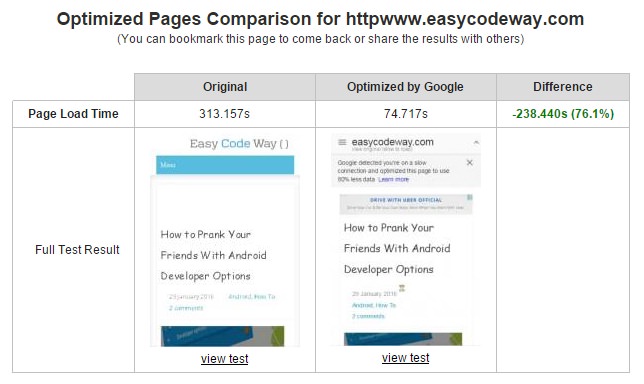
According to the reports, when my website is tested in GoogleWebLight mode, it opens 76.1% faster. So it's a good sign. You can also watch the video from their to understand the changes more deeply. Additionally, you can compare other reports by viewing complete test for both original and optimized website. I am not discussing them here as they are beyond the scope of this tutorial. So its better to analyze them yourself.
Also Read: How Google-Twitter partnership is culprit for Facebook
Finally lets summarize all these features in small points. Below are few of the positive benefits of using GoogleWebLight mode.

As for now, this feature is limited to mobile phones only. However, you can also use it on your desktop browsers but for that, you've to manually change the web-address of pages you want to load in GoogleWebLight mode. In this tutorial, I will guide you how to do that and after that we will discuss some of its interesting feature. So lets begin now!
How to Load Web Pages In GoogleWebLight Mode
Imagine, how it would to save your net data and loading time while reading your favorite blog? Sound Good? Hm. GoogleWebLight feature can help you to do this. Now if you want to use this feature, follow these instructions -
First of all, copy below web-address in URL tab and replace "[your_website_URL]" with the website you want to transcode with GoogleWebLight.
http://googleweblight.com/?lite_url=[your_website_URL]
Make sure that you've typed "https://www." before the domain name. For Example:
http://googleweblight.com/?lite_url=https://www.easycodeway.com
Finally hit enter button and let the magic begin. It will automatically compress the whole web-page and present you with the simplest format. Now if you'll click on any of the internal link then it will be automatically loaded in the same transcoded version. So how was it ? Isn't that cool ?
Note: At present, some sites are not transcoded due to technical problems. These include video sites (YouTube is a good example), site that uses lots of cookies (like Facebook) and which are technically hard to transcode.
If you'll load such pages, then it will display an error message as follows -
Transcoding test failed.
This page could not be transcoded due to technical issues.

What Does GoogleWebLight Do Actually?
You know it is very important to keep user experience and performance in balance and undoubtedly, Google understand this very well. They know what users actually want and that's why GoogleWebLight is well optimized for user experience and performance. Now I think you are more curious to know that how this thing works. Here I am presenting a small own case study which can surely help you to give better dive in this topic.
I experimented easy code way domain in GoogleWebLight and then compared the data with original website. Look I found some interesting changes.

First of all, have a look at the navigation menu. In transcoded version, there is no navigation links while in original website, drop-down menu comes whenever you'll click on "Menu" button. I am using a JavaScript for scroll down feature. After this, I concluded that GoogleWebLight has completed omitted this JavaScript code in transcoded version which itself is a very big achievement to improve the site load time. Its the JavaScript who is the main culprit to reduce web pages load time but I think GoogleWebLight is smart enough to handle it. ;) However if you'll click on those three lines from top-right corner, you'll find that there is another menu for site navigation. This means that, GoogleWebLight has created its own menu which is well optimized and lightweight.

Now have a look at the post images. There is a little change in quality. In some places, even I can't locate the image which was present in original website. So again this is a plus point for GoogleWebLight. It only represents important data and keeps other waste out.
As like JavaScript and Images, transcoded page will also make few changes in CSS programming. I think you don't need any explanation for this. Just look at the picture bro. You can easily find out the change in margin, padding, hover effect, font-size and blaw blaw blaw. Again, one thing to note here is that there is no external font family used in transcoded version while I am using few of the google fonts in easy code way. So this will prevent the browser from loading that font family from external links and thus again reduce the load time and improve more speed.
Last but not least, GoogleWebLight will display only 3 ads units in a single web page and that too at the fixed places. Three? Well don't suppose it to be ad free. Google itself is serving AdSense ads and if their will be 0 ads then many publishers will lose huge money. This again proves that Google is neutral everywhere. Here it keeps balance between users and website ads publishers.
Compare Page Load Time
Above is just my own case study. Now if you want to compare the page load time between the transcoded and non-transcoded version than you can use an online tool named as www.webpagetest.org
Actually this tool is a Google product and it can be very helpful in many ways especially if you are a blogger or web-developer. It will provide you complete information about your webpages performance.
To use it, simply open the above website and then write the web-address you want to test. After this, click enter button and leave it for few minutes. It may take up to 10 minutes to scan your webpage. When I tested easy code way in this, it takes 5 minute and after that it display a screen as shown in below picture.

According to the reports, when my website is tested in GoogleWebLight mode, it opens 76.1% faster. So it's a good sign. You can also watch the video from their to understand the changes more deeply. Additionally, you can compare other reports by viewing complete test for both original and optimized website. I am not discussing them here as they are beyond the scope of this tutorial. So its better to analyze them yourself.
Also Read: How Google-Twitter partnership is culprit for Facebook
Summary!
Finally lets summarize all these features in small points. Below are few of the positive benefits of using GoogleWebLight mode.
- It will boost up your surfing speed (pages will load 4x faster).
- Of course, It saves Internet data (up to 80%).
- It provides well optimized menu for site navigation.
- It will reduce JavaScript and CSS and thus improve load time.
- Currently it will display only 3 ads units.

How to handle transcoding test failed error?
ReplyDelete